Showing posts with label Freddy Roman Maker & Restorer. Show all posts

Wednesday, March 28, 2018

Its all in the details....


There is something special about old stair cases in a home. I love the overall statue, the details, and the overall construction. Its easy to see why these stair cases have lasted so long! Today sadly the majority of the stair cases are being made or restored to a lower quality. 

Can you blame the contractors? My answer is yes and no. Some contractors simply don't know how the makers of the past made stairs, or simply there isn't enough money in the budget. But if there is a budget to restore a stair case than I think they must make them how they once were versus simply toe nailing balusters in place and making round tenons. 

Below you will find a stair case with dovetailed balusters. Its simply a thing of beauty. I was luck to bid on this job but sadly I didn't get the job because the contractor didn't budget the cost and necessary work involved. 

But I am happy to say that I was able to educate the contractor and now he will have me bid on staircases before hand. Today my interest in the woodworking world is more in houses and architectural details. While I love furniture there is more money in house work and for me to continue  living the dream I must do what I can to save the pass and make money as small business. 

If you have a staircase that needs a little TLC, than contact me. I will happily travel to the site if the money is right. 

Cheers!


Tuesday, March 27, 2018

Sanding Block


Sanding, some of us hate it while others so call love it. Either way we need to do it. So why not sand comfortably with Time Saver Tools, Preppin Weapon Sanding Blocks.  The blocks came to my attention by furniture maker Clark Kellogg from Texas. These blocks were in the back ground of an image on Instagram. Well one day while strolling through Woodcraft Supply I found this sanding block on the shelf. Once in my hand I knew why Clark loved them. Now I wanted them! 

This lead me to find them online and buy every color. Why all the colors? Well I can set them all up with different grits. The coarsest is red and the finest is blue. The color line up is red, yellow, green, and blue. The blocks feel amazing in my hands and I can happily say these are a great investment and a joy to use. 

I may even say I like sanding. Ha! Yeah right. Well at least my hands don't hurt as much anymore. 

Cheers,

FR


Monday, October 9, 2017

Stripping furniture.


Stripping furniture doesn't always involve using strong toxic chemicals like methylene. Often if the piece has shellac or lacquer as a top coat you could use solvents to strip the piece. But first you will need to know the solvent binder in the finish you are trying to remove. For example the image above is a table top with 2 drop leafs. The finish on the piece has been determined to be shellac. How did I determine the finish? I used a cotton q-tip dipped in solvent to see if the finish would react to a particular solvent.

As we all know denatured alcohol or grain alcohol melts/softens shellac. So I took t-shirt rags spread them across the top and pored alcohol on them. I let the rags sit for 5 mins or so and checked the progress. Upon inspection I take notice of the finish and see if it appears gummy. If you ever used chemical strippers than you know exactly what I mean by the gummy appearance. If and when the surface is ready I would wipe the surface down with the rag soaked in alcohol.  Often it takes two rounds of ragging. This process can be used on shellac and lacquer, I have to test it on another finishes. Always remember to dispose or air out the rags properly.

After the finish has been removed sand lightly and top coat the piece once again.

Happy solvent stripping.

Sunday, September 10, 2017

Many trades come together to restore an entry of a Brownstone


Just recently I had the great opportunity to help Ryaan Tuttle from RJT Carpentry and Tile to restore this pair of amazing entry doors.  It was amazing to see all the trades coming together and restoring this entryway with so much age and history. The crafts are alive and we the few are working hard to save, conserve, and restore the old, vintage, and quality from the masters before us. 

Sunday, August 27, 2017

Turned beaded moulding.


 I needed to make a beaded moulding for a clock I am restoring.  But before I spend the 10 mins of joy making the beaded moulding there is a list of things that must get done first.

The beaded moulding that is attached to the back of the clock door needs to match this exactly. I was able to trace the profile and match the diameter with one of my chainsaw files.

But before I can turn the bead I need to create a mounting plate and two wooden rings that are oversized in diameter.

The first step is to layout center and scribe the desired circle on a piece of plywood and mahogany. Pay attention to the grain direction in the mahogany to ensure it matches.  Once the circles are scribed I cut them out on the bandsaw. Again everything is over sized.


 After the plywood and mahogany are cut I than make a paper joint glued with hide glue. The reason for adding American kraft paper is for ease of removing the moulding from the plywood. The glue up sequence went baltic birch plywood, kraft paper, mahogany. I also used Old Brown Hide Glue for its  open time. With the glue spread I clamped everything together and added wax paper just in case any glue squeeze occurs.


Clamping even inch I could to ensure everything is clamped properly. The last thing you need is the wood to fly off. 

Getting ready for gluing. Often I span my glue ups between the jaws of my vise. This allows proper support as I clamp.

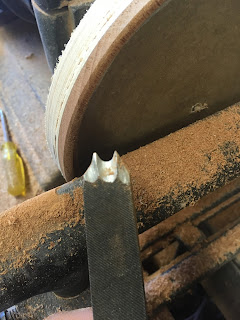
Next came the grinding of the cutter necessary to make the bead. The tool of choice is the tip of an old file. This is a common technique in the restoration world and one that should be remembered. 

Here I am filing the tip of the file to match the moulding. The file I used was a 1/8 diameter chainsaw file. Hand files are made from mild steel so modifying them is quite easy. 

The tip of the file shaped. 

This is the view of the first beveling on he bottom of the cutter. 


After the primary grind has been establish I than use a a chainsaw file, or a small grinding wheel, or dremel to grind as much metal away. I often compare this to a complex moulding plane iron. By removing as much metal as possible I can than hone the cutter with slipstones to ensure a quality cut. 

Once everything has dried and the cutter has been made its time to turn. But first I need to bore a center hole in the plywood so I can screw it to the treaded center of the Carey lathe. Side note: The  W. W. Carey lathe was made in the end of the 19th century in Lowell, MA and an amazing lathe to say the least. 


The screw center. 

Center bored
Before I can start turning the bead I must first remove the necessary material to ensure the lathe and the turning are true and balanced. This is the reasoning for leaving everything over sized. Once everything is close to true, I can than turn the thickness and width down to size. I used a parting tool to do all the lathe work necessary before introducing the customer cutter.

I tested the cutter before reaching final thickness. I wanted to make sure I understood how the tool would cut. 

Where I engaged the the tool to the wood. 

Here you can see I am reaching final width and depth. 

The turning wasn't 100% balanced and true but it was close enough. 

The end result was a success.

There was a lot work involved just to get ready to turn. But boy those 10 mins of turning was fun.


I hope you found this interesting and remember in case you need to make a custom cutter someday.

Sunday, August 20, 2017

Furniture Hardware. Keeping track.


When restoring furniture often this means taking pieces apart. But like taking a car engine apart, I am not just going to do grab all the hardware and put them in a box or a glass jar. Instead I am going to have holder laying out exactly where each piece of hardware came from. Often I use a piece of cardboard and just make a series of holes with a knife or an awl. Than I place the screws, nails, escutcheon pins, locks, handles, hinges, or whatever in a sequence that allows me the reassurance that everything goes back exactly where they came from. The holder can be made from cardboard or plywood or even hardwood. Lastly I make notations on the holders so that not only I can I install the hardware exactly, but that my subs can too. For example I will label a series of screws with the word left (L) and right (R) to make certain I don't flip the screws around. If L & R isn't enough I even label from what position I am looking at the piece when I wrote L & R. 

While this may be a simple tip it is amazing how useful it can be in the shop or onsite. 

Cheers.


Wednesday, August 16, 2017

Screws that won't budge. What to do.....


As a restorer  I often am taking something apart and reassembling it. Often the screws that I am removing are slotted. I know, I know. Most of you hate slotted. But I on the other hand love them. So what do you do when a screw doesn't want to budge? Well a long time ago I learned by heating the head of the screw with a soldering iron you can make the wood pull away from the heat. Also if you heat the screw hot enough, once the metal cools it shrinks just enough for the screw to  be loosen. The soldering iron tip I find the most useful is the one that tapers on all four faces and fits into the screw slot.  

Once the screw has been heated a very important too you will need is a proper screw driver that fits properly in the screw slot. Another great tip is to bevel the corners of the screw driver tip so it doesn't ruin the slot.  We restorers like to keep things nice and tidy. Lastly once you've heated the screw and everything is cooled down, make sure to first twist right to break any bond and than rotate left to remove the screw. 

The next blog post will be about keeping track of your hardware. So stay tuned for that. 

Thursday, July 13, 2017

Shop essentials- "Rags"

Shop rags are very handy items. I have 70 pounds or so in the shop. I use them for finishing, dusting, waxing, wiping sharpening grit and grime, cleaning up furniture or glue.  But finding quality and consistent rags that don't cost you an arm and a leg is a different discussion. Or is it? For years I would buy quality rags, 5 pounds $25 dollars. I thought this was a great deal since the rags were all the same size and the quality was great. Come to find out the rags were way over priced. So I went to the big box stores for rags to save a buck. Boy was that a mistake.   

So a few years ago when I was visiting a school I noticed they had cases of rags. The instructor at the school noticed me looking at the rag box and said take some we have tons. I felt I had to take some since I already spent almost $500 on rags that year already. As I always say anything to save me some money.  While grabbing a hand full of rags I noticed a shipping label that said Textile Waste Supply Company. 

It didn't take long for me to google the company and find the company headquarters. The information can be seen below in image one.  I bet you can guess where I  purchase my recycled high cotton count sheet rags and t-shirt rags in 5 pound billets today. Lets just say the savings are just amazing. 

If you are in the market to save money and need quality rags than I highly recommend Textile Waste Supply Company in Charlestown MA. 

Happy Wiping. 


Sunday, July 9, 2017

My favorite sideboard

My inspirations for form, style, and proportions come from the pass. I love the sideboard seen below but sadly its in storage and hasn't seen the light in many years, which I find ridiculous. I'm pretty familiar with the form and construction of this piece but can't get into the details of it due to a contract I signed. Which is another ridiculous story.  But I am hoping to get access to this piece in the near future and bring it to life by making a reproduction of all the awesome details.

Sideboard

1790–1805

Object Place: New York City, New York

DIMENSIONS

Overall: 100 x 205.1 x 78.7 cm (39 3/8 x 80 3/4 x 31 in.)

ACCESSION NUMBER

1978.301

MEDIUM OR TECHNIQUE

Mahogany ,satinwood inlays, pine, poplar (?)

NOT ON VIEW


Provenance
1928, Harry V. Weil, dealer; 1920s, Israel Sack, dealer; sold to Edward R. Fearing (private collector); ca. 1962, reacquired by the Sack firm; later acquired by Lewis Cabot; by descent to the donor, Mrs. Judy Cabot Bullitt, 120 East End Ave., New York (Accession Date September 13, 1978)

Credit Line

Gift of the Lewis P. Cabot Family

Monday, July 3, 2017

MakerCast Podcast Interview

A couple weeks ago I had the honor to partake in one of my favorite podcast, The MakerCast podcast. The podcast is hosted by Jon Berard a machinist who dives into craftspeople pass and current journey in world of makers. Its a great podcast and one I highly recommend.  The current episode is about me, my journey, my schooling, my business, my struggles, and much more. Please give it a listen and let me know what you think. Here is the link: http://www.podcastformakers.com/freddy-roman/


Cheers!

Tuesday, June 6, 2017

School Box Class at Lie-Nielsen Tool Works

On June 3rd & 4th I was invited to teach a class at Lie Nielsen Tool Works, located in Warren, Maine. For me this is a humbling opportunity and well now its an experience.  I am happy to say the class was sold out and everyone learned a ton and had fun. Many of the students completed the school box and many are in the final stages of completion.  

If you don't know of the school box project than please head over to Lost Art Press and take a look at the amazing book titled, "The Joiner and Cabinetmaker". The school box is one of three projects detailed in the book.   


Jim was one of those students that was so good that I had to keep up with him . 


 The two photographs above are from my studio where I am in middle of making the school box. I always make the project before the class starts to prepare myself mentally and verbally. More importantly I consider the possible mistakes that may occur and the possible options to correct the possible mistakes.

Highlights of the class....

Planes just hanging out. Ready to be used and tested. 

All the saws are sharp and ready for work. 

The students hard at work. 

Deneb from Lie Nielsen going over the honing guide, the sharpening process, and the ruler trick. I think I am  a convert. 
 Highlights of the showroom....


Every tool Lie Nielsen offers is available for use. 


I went and visited a BNB that a few of the Cerritos Woodworking College Students were staying at.
The view was amazing. 

Hanging cabinet by Chris Schwarz.
Another highlight of the weekend was Liz my assistant in the class. Liz works at Lie Nielsen and has a major in furniture design and making.  I personally think Liz will make a great instructor. The passion she has and the skill she possess is just amazing. 


Progress. 


Camerino was one of two students from the Cerritos College of Woodworking.  I honestly have never seen a modern woodworker cut dovetails so flawless and so perfect. It was scary how skilled this kid was. I wish he lived closer so I can hire him to work with me. 

Just about every 1/2 hour I would inform the class that if this starts to feel like work it means its time to sharpen. 


Mark was very happy in the progress. 


Mr. Carpenter was a hard worker. There was huge progress in the hand skills after this weekend. 

There may not be many of us FIMsters but one thing is certain we are damn good. 

Glue up time. 


Nailing the bottom. 

Cut away plane. 

Cut away low angle jack. 

We use blue tape to hold things in place while the glue dries. 

Eric one the students from Cerritos Woodworking School in California. I took this image because he reminds me of Cheech. In all seriousness Eric is very talented and a great person. I hope he is very success in his woodworking career. 


Benjamin another student from Cerritos College is a great person. So skilled and passionate. Benjamin and I have a lot  in common. I wish he lived closer. I think we would become great friends. Another young man that I would love to hire. 

Just fitting those dovetails. These dovetails were flawless. It was breathtaking.


Well that is all folks. The class was a success. I work hard in having the students leave with a completed or almost completed project. I hate having students leaving with piles of parts. So my goal is to work them like employees but in a fun enjoyable atmosphere. I think I did just that.

Till next happy dovetails and remember this stuff is just wood and it grows on trees.

Cheers.