I needed to make a beaded moulding for a clock I am restoring. But before I spend the 10 mins of joy making the beaded moulding there is a list of things that must get done first.
The beaded moulding that is attached to the back of the clock door needs to match this exactly. I was able to trace the profile and match the diameter with one of my chainsaw files.
But before I can turn the bead I need to create a mounting plate and two wooden rings that are oversized in diameter.
The first step is to layout center and scribe the desired circle on a piece of plywood and mahogany. Pay attention to the grain direction in the mahogany to ensure it matches. Once the circles are scribed I cut them out on the bandsaw. Again everything is over sized.


After the plywood and mahogany are cut I than make a paper joint glued with hide glue. The reason for adding American kraft paper is for ease of removing the moulding from the plywood. The glue up sequence went baltic birch plywood, kraft paper, mahogany. I also used Old Brown Hide Glue for its open time. With the glue spread I clamped everything together and added wax paper just in case any glue squeeze occurs.
 |
| Clamping even inch I could to ensure everything is clamped properly. The last thing you need is the wood to fly off. |
 |
Getting ready for gluing. Often I span my glue ups between the jaws of my vise. This allows proper support as I clamp.
|
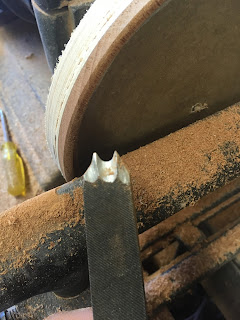
Next came the grinding of the cutter necessary to make the bead. The tool of choice is the tip of an old file. This is a common technique in the restoration world and one that should be remembered.
 |
| Here I am filing the tip of the file to match the moulding. The file I used was a 1/8 diameter chainsaw file. Hand files are made from mild steel so modifying them is quite easy. |
 |
| The tip of the file shaped. |
 |
| This is the view of the first beveling on he bottom of the cutter. |
After the primary grind has been establish I than use a a chainsaw file, or a small grinding wheel, or dremel to grind as much metal away. I often compare this to a complex moulding plane iron. By removing as much metal as possible I can than hone the cutter with slipstones to ensure a quality cut.
Once everything has dried and the cutter has been made its time to turn. But first I need to bore a center hole in the plywood so I can screw it to the treaded center of the Carey lathe. Side note: The W. W. Carey lathe was made in the end of the 19th century in Lowell, MA and an amazing lathe to say the least.


No comments:
Post a Comment