Saturday, December 30, 2017

New Book: Thomas Chippendale Junior


Where I bought book can be found below.


Description of the book:

The Chippendale cabinet-making firm, founded by Thomas Chippendale senior in about 1750 became famous partly through the succesful publication of his The Gentleman and Cabinet-Maker's Director (1754, re-published 1755 and 1762), and partly through the fine furniture supplied to a number of illustrious clients. Chippendale senior ran the workshop for just over twenty years. His eldest son Thomas Chippendale junior continued the business for over forty, the first two decades in partnership with Thomas Haig. Chippendale senior's work has been well documents. Chippendale junior's work has never, until now, been thoroughly researched. The Life and Work of Thomas Chippendale Junior repairs the omission. His patrons included members of the Royal Family, aristocrats, landed gentry and antiquarians. He was adept at satisfying their demands, whether they required lavish gilt or simpler, often mahogany, pieces. Where family archives and original settings survive, as at Harewood House, Paxton House and Stourhead, they reveal the variety and quality of Chippendale's output. Analysis of client's invoices, even when the furniture can no longer be traced, for the first time provides a colourful view of what customers chose and what prices they paid.

Product Detail:

  • Hardcover: 464 pages
  • Publisher: Philip Wilson Publishers (December 30, 2017)
  • Language: English
  • ISBN-10: 1781300569
  • ISBN-13: 978-1781300565
  • Product Dimensions: 9.4 x 1.7 x 11.3 inches
  • Shipping Weight: 5.8 pounds


Shop Signs


The importance of shop and lawn sign is rarely discussed. Even spelling out every service that is being offered is key these days. These signs are short money and I highly recommend every small business to use as much signage as possible.

Friday, December 29, 2017

English Clock


I had a clock come in to the shop or should I say studio. The clock came in for adhering of any and all loose cross banded moulding. There was also a couple sections of moulding that needed to be reproduced.  In this post I highlight the amazing clock. This clock was/is breathtaking. 


Friday, December 1, 2017

Pricing your work

Hello everyone. I wanted to share with you episode 11 of the Against the Grain Podcast. In this episode we discussed Pricing your work. I am certain the information being shared by Guy Dunlap, Justin Dipalma, and myself Freddy Roman will be very educational, informative, and eye opening.


If episode #11 wasn't enough to catch your attention than the following video surely would help. Shawn Van Dyke who is a business coach and who will be my business coach is the best in the business and surely worth a follow on Instagram https://www.instagram.com/shawnvandyke/. Also it will be worth you wild to visit his website http://shawnvandyke.com.


Please leave your comments and give all of us a follow.

Cheers.


Monday, November 27, 2017

Flexible wood as clamps.

I'm in the middle of repairing a French Commode that has sadly been repaired incorrectly in the pass. One of the many issues with the commode was the drawer runners, kickers, and guides.  As I repair all the broken elements I come to the realization there isn't a easy way to clamp my repairs. 

So what to do?  Well I decided to try flexible thin pieces of wood cut to a size that gives me the desired clamp pressure. There isn't a write rule on this, often its a trial and error.  

Below you will find two examples of flexible strips giving me the desired pressure and clamping I needed to glue down all the repairs. 

I hope you find this helpful.

Cheers, 


Sunday, November 26, 2017

Before and After Eastlake Chair

My apologizes for the lack of blog posts. I do have a good excuse I am moving into a larger shop. I will also have my first full time subcontractor, which is scary.  This is a brand new learning experience for me, but I am excited about this new journey.   With that said I am happy to say the new shop will be more successful than I ever imagined. Lets just say location, location, location.  

Below you will find the simple reason why I love old furniture. You can simply take the so called old fashion and turn into something more modern by simply changing the fabric. The Eastlake chair came into the studio for cleaning, gluing of all loose parts, and upholstery. The end result was very pleasing to the eye and is ready for years of use. But more importantly the client was very happy. 

Cheers!


Sunday, October 22, 2017

Guest on the Protractor Podcast


One of my favorite podcast titled the "Protractor Podcast" kindly invited me to be a guest. If you are interested in listening than subscribe and listen here: http://protractorpodcast.com/freddy-roman/

Enjoy.

Monday, October 9, 2017

T-shirts For Sale


Many people have requested for me to have t-shirts for sale. Well here they are. In stock and ready for sale. I have L and XL currently. But if you are interested in any other size please let me know. I am selling the shirts for $10 plus shipping.

Stripping furniture.


Stripping furniture doesn't always involve using strong toxic chemicals like methylene. Often if the piece has shellac or lacquer as a top coat you could use solvents to strip the piece. But first you will need to know the solvent binder in the finish you are trying to remove. For example the image above is a table top with 2 drop leafs. The finish on the piece has been determined to be shellac. How did I determine the finish? I used a cotton q-tip dipped in solvent to see if the finish would react to a particular solvent.

As we all know denatured alcohol or grain alcohol melts/softens shellac. So I took t-shirt rags spread them across the top and pored alcohol on them. I let the rags sit for 5 mins or so and checked the progress. Upon inspection I take notice of the finish and see if it appears gummy. If you ever used chemical strippers than you know exactly what I mean by the gummy appearance. If and when the surface is ready I would wipe the surface down with the rag soaked in alcohol.  Often it takes two rounds of ragging. This process can be used on shellac and lacquer, I have to test it on another finishes. Always remember to dispose or air out the rags properly.

After the finish has been removed sand lightly and top coat the piece once again.

Happy solvent stripping.

Sunday, October 8, 2017

Clamps are my weakness....

What can I say I am addicted to buying quality clamps. Many of us already know the options or lack thereof when buying clamps. Sadly manufactures like Wetzler, Hartford, Hargrave, Cincinnati Tool Company, and most recently Jorgensen have all closed their doors. So where does that leave us? There is Ebay which lets be real can be a little crazy when it comes to prices. But if you want to buy "new" than the only options you have these days are Bessey and Piher.  I am not saying you are not going to find a bargain on vintage clamps but it's getting harder. 

This leads me to my recent Ebay purchase that lead me to New York. I was lucky to purchase 13 Hartford clamps for a great price. While speaking with the seller he kindly and smartly mentioned he had more clamps he was going to sell.  Since I was planning to drive 3 hours each way why not buy everything I can. 

Well below you find the recent load of clamps. Lets just say I am pretty darn happy and excited. Now  I don't buy clamps just randomly. There are a certain sizes I use the most. The most common clamps I use range in the 12-30 inch clamping capacity. 

This post isn't me bragging but rather buy what you can when you see it. Its getting tough out there. 

Happy hunting. 


Sunday, September 10, 2017

Many trades come together to restore an entry of a Brownstone


Just recently I had the great opportunity to help Ryaan Tuttle from RJT Carpentry and Tile to restore this pair of amazing entry doors.  It was amazing to see all the trades coming together and restoring this entryway with so much age and history. The crafts are alive and we the few are working hard to save, conserve, and restore the old, vintage, and quality from the masters before us. 

Selfish plug of a new Podcast


Well folks a new podcast has hit the airways and I wanted to share it with you.  You can find the Against The Grain podcast on iTunes, Stitcher, Google Play, Soundcloud, and the website https://www.theatgpodcast.com. Please give it a listen and let us know what you think. 


Sunday, August 27, 2017

Turned beaded moulding.


 I needed to make a beaded moulding for a clock I am restoring.  But before I spend the 10 mins of joy making the beaded moulding there is a list of things that must get done first.

The beaded moulding that is attached to the back of the clock door needs to match this exactly. I was able to trace the profile and match the diameter with one of my chainsaw files.

But before I can turn the bead I need to create a mounting plate and two wooden rings that are oversized in diameter.

The first step is to layout center and scribe the desired circle on a piece of plywood and mahogany. Pay attention to the grain direction in the mahogany to ensure it matches.  Once the circles are scribed I cut them out on the bandsaw. Again everything is over sized.


 After the plywood and mahogany are cut I than make a paper joint glued with hide glue. The reason for adding American kraft paper is for ease of removing the moulding from the plywood. The glue up sequence went baltic birch plywood, kraft paper, mahogany. I also used Old Brown Hide Glue for its  open time. With the glue spread I clamped everything together and added wax paper just in case any glue squeeze occurs.


Clamping even inch I could to ensure everything is clamped properly. The last thing you need is the wood to fly off. 

Getting ready for gluing. Often I span my glue ups between the jaws of my vise. This allows proper support as I clamp.

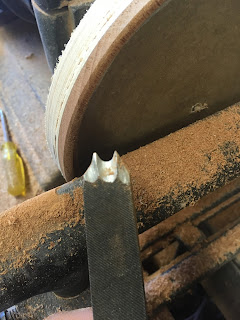
Next came the grinding of the cutter necessary to make the bead. The tool of choice is the tip of an old file. This is a common technique in the restoration world and one that should be remembered. 

Here I am filing the tip of the file to match the moulding. The file I used was a 1/8 diameter chainsaw file. Hand files are made from mild steel so modifying them is quite easy. 

The tip of the file shaped. 

This is the view of the first beveling on he bottom of the cutter. 


After the primary grind has been establish I than use a a chainsaw file, or a small grinding wheel, or dremel to grind as much metal away. I often compare this to a complex moulding plane iron. By removing as much metal as possible I can than hone the cutter with slipstones to ensure a quality cut. 

Once everything has dried and the cutter has been made its time to turn. But first I need to bore a center hole in the plywood so I can screw it to the treaded center of the Carey lathe. Side note: The  W. W. Carey lathe was made in the end of the 19th century in Lowell, MA and an amazing lathe to say the least. 


The screw center. 

Center bored
Before I can start turning the bead I must first remove the necessary material to ensure the lathe and the turning are true and balanced. This is the reasoning for leaving everything over sized. Once everything is close to true, I can than turn the thickness and width down to size. I used a parting tool to do all the lathe work necessary before introducing the customer cutter.

I tested the cutter before reaching final thickness. I wanted to make sure I understood how the tool would cut. 

Where I engaged the the tool to the wood. 

Here you can see I am reaching final width and depth. 

The turning wasn't 100% balanced and true but it was close enough. 

The end result was a success.

There was a lot work involved just to get ready to turn. But boy those 10 mins of turning was fun.


I hope you found this interesting and remember in case you need to make a custom cutter someday.

Sunday, August 20, 2017

Furniture Hardware. Keeping track.


When restoring furniture often this means taking pieces apart. But like taking a car engine apart, I am not just going to do grab all the hardware and put them in a box or a glass jar. Instead I am going to have holder laying out exactly where each piece of hardware came from. Often I use a piece of cardboard and just make a series of holes with a knife or an awl. Than I place the screws, nails, escutcheon pins, locks, handles, hinges, or whatever in a sequence that allows me the reassurance that everything goes back exactly where they came from. The holder can be made from cardboard or plywood or even hardwood. Lastly I make notations on the holders so that not only I can I install the hardware exactly, but that my subs can too. For example I will label a series of screws with the word left (L) and right (R) to make certain I don't flip the screws around. If L & R isn't enough I even label from what position I am looking at the piece when I wrote L & R. 

While this may be a simple tip it is amazing how useful it can be in the shop or onsite. 

Cheers.


Wednesday, August 16, 2017

Screws that won't budge. What to do.....


As a restorer  I often am taking something apart and reassembling it. Often the screws that I am removing are slotted. I know, I know. Most of you hate slotted. But I on the other hand love them. So what do you do when a screw doesn't want to budge? Well a long time ago I learned by heating the head of the screw with a soldering iron you can make the wood pull away from the heat. Also if you heat the screw hot enough, once the metal cools it shrinks just enough for the screw to  be loosen. The soldering iron tip I find the most useful is the one that tapers on all four faces and fits into the screw slot.  

Once the screw has been heated a very important too you will need is a proper screw driver that fits properly in the screw slot. Another great tip is to bevel the corners of the screw driver tip so it doesn't ruin the slot.  We restorers like to keep things nice and tidy. Lastly once you've heated the screw and everything is cooled down, make sure to first twist right to break any bond and than rotate left to remove the screw. 

The next blog post will be about keeping track of your hardware. So stay tuned for that. 

Thursday, July 13, 2017

Shop essentials- "Rags"

Shop rags are very handy items. I have 70 pounds or so in the shop. I use them for finishing, dusting, waxing, wiping sharpening grit and grime, cleaning up furniture or glue.  But finding quality and consistent rags that don't cost you an arm and a leg is a different discussion. Or is it? For years I would buy quality rags, 5 pounds $25 dollars. I thought this was a great deal since the rags were all the same size and the quality was great. Come to find out the rags were way over priced. So I went to the big box stores for rags to save a buck. Boy was that a mistake.   

So a few years ago when I was visiting a school I noticed they had cases of rags. The instructor at the school noticed me looking at the rag box and said take some we have tons. I felt I had to take some since I already spent almost $500 on rags that year already. As I always say anything to save me some money.  While grabbing a hand full of rags I noticed a shipping label that said Textile Waste Supply Company. 

It didn't take long for me to google the company and find the company headquarters. The information can be seen below in image one.  I bet you can guess where I  purchase my recycled high cotton count sheet rags and t-shirt rags in 5 pound billets today. Lets just say the savings are just amazing. 

If you are in the market to save money and need quality rags than I highly recommend Textile Waste Supply Company in Charlestown MA. 

Happy Wiping. 


Wednesday, July 12, 2017

Parlee Lumber and Box Co.- Thank you.

I often hear many woodworkers complaining about lumber mills/yards becoming fewer and fewer. I always smirked and said I don't have to worry about that. Or so I thought. Sadly one of the oldest, if not oldest mill in New England is closing down. The company has been around for about 250 years and located in Littleton MA. Once called Parlee Lumber and Box Co. a family owned lumber yard and a staple for all craftspeople in New England. 

The lumber mainly sold at Parlee was Eastern White Pine but if you knew them well like I did,  than you would know that they also had Walnut, Cherry, Birch, and Maple in the way back hidden for the best customers. I was lucky and honored enough to be called a great customer. But I really think I got to become a great customer because of the respect I had for the yard. I always stacked the racks just as good or better than I found them, and I always paid respects to the workers.   

The pine available was either air dried or kiln dried. In C select or D Select. Clear one side. But they also offered pine mulch, tongue and groove, shipped lapped, stakes, live edge, table top cuts, and 40 inch wide 20 feet long. It was amazing what the mill had. 

But sadly it all comes to an end in a month or so. Which is depressing. What will replace it? Most likely crappy condos, townhouses, or possibly poorly built homes without any character or proper proportions.   

What also saddens me is the marking of a second lumber yard that has disappeared locally. Where does that leave me or should I say us? Well now I am like many others starting to complain that I need to travel at least an hour each way to get my lumber. Soon even that will disappear. What are we truly suppose to do as craftspeople if our sources of supply are disappearing?  But what is worst is the quality of lumber is shrinking and the prices are doubling.