Wednesday, December 23, 2015

Learn to make a Chippendale Table

Chippendal Table copy


When people think Chippendale furniture they think of ball and claw feet and elaborate carvings. What many seem to forget is the some of simplified Chippendale furniture. I love period examples that have marlboro feet with stop chamfers on the legs. The astragal moulding that is wrapped around the table's frame or moulded into the top.  These details yell CHIPPENDALE, but without all the robust details.  

Starting this February I will teaching how to make this great Chippendale table. I will be teaching this course over 4 Saturdays.  This will be a fun class and one I think many will enjoy. I hope you can all join me in exploring the more simplified version of Chippendale furniture. For more information please visit the following link; Chippendale Table Class 


Sunday, December 20, 2015

The Chiavari Chair.


Over the years I have been attracted to a style of chair that appear quite delicate. Unfortunately I didn't know how to describe such a chair or its origin. It took Tim Manney a talented Chairmaker and his blog to finally find its origin and history. The chair is known as a Chiavari Chair! 

Don't be fooled by its delicate appearance. The Chiavari chair is an extremely durable whimsical looking chair. I have purchased a couple of these Chiavari style chairs at flea markets over the years. I keep the two chairs hanging on the wall in my shop. I look at them daily and envision making them. Its quite amazing to see all the angles and shaping on the chairs. I look forward to exploring them and hopefully finding more of them. Maybe I can convince Tim Manney to work on one together. 

This style of chair was first designed in 1807 by a chair maker, named Giuseppe. The goal for Giuseppe was to make a chair that could be lifted with a single finger. There is only one factory in Chiavari that still makes these chairs by hand. The Fratelli Levaggi Chair Factory was founded 50 years ago with the goal to replicate the craftsmanship of the Chiavarina chair.


Saturday, December 19, 2015

Un Trabajo Feliz... Happy Work...

"In the whole world there's only two kinds of jobs. There's a a job you take a shower before you got to work in the morning. And there's a job the you take a shower when you com home from work at night. And the world needs both of us."-Eric Hollenbeck.

If you ever wanted to understand the efforts a craftsperson puts in every piece, than I highly recommend the following video; Happy Work... Un Trabajo Feliz...  Over the last 10 years of my professional career I have tried to share with the world what really is involved in making a piece of furniture or repairing a wooden artifact. What may appear simple in peoples eyes is usually much more complex. If this field was than everyone would be doing it.


Friday, December 18, 2015

How to become a writer....


On May 29, 2011 Chris Schwarz wrote a post on his blog titled "How to Become a Writer".  Since I read this post I have been working hard to become a better writer.  I am nowhere near where I want to be. I decided to buy the book Chris recommended and hope to improve. The book he recommended can be seen above. 

Saturday, December 12, 2015

The Wedge


I often get asked how do I take apart chairs? Well usually chairs come to me because they are often loose, which means there are gaps between the joints. This allows me to use artist pallet knives and wedges to separate the joints.  The wedges depending on the wood and value can be made from pine, poplar, or even maple. I have a ton on hand for I break them often. There are also moments when hot vinegar is used to help soften the glue. Its amazing what a little vinegar warmed in the microwave can do for you.  

Moving damage on a carved frame


Recently I have decided to record some of my work. This goes back to the day I read Chris Schwarz blog post on why to blog. Sometimes its not about who reads your blog but rather have your work recorded for the future. 

I was recently contacted by a restorer who had a mirror that was damaged in a move. I am not sure why the broken elements weren't saved! So I made a mold from another section of the mirror that matched closely to the missing section. Once the mold harden in about 6 hours I was able to remove it from the mirror.  I than poured the casting material in the mold and within 1 hour I had a mold made. 

Next came the shaping, filing, sanding, and carving of the mold.  Attaching the mold to the small tips was also fun. I am not sure why, but I love this complex work. I barrier coated all wooden areas that was going to be glued with hide glue, and once dry I epoxied the mold in place.  

After the epoxy was dry I applied some red and yellow ochre pigments, and than some gold pigment powders. Lastly I applied a little shellac. I am happy with the results and so is the client.   


Friday, December 11, 2015

The Ebony Cane

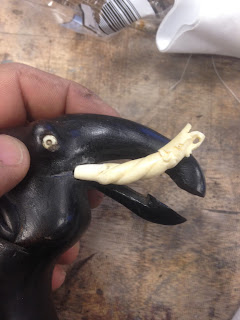
A client had a walking cane made from Gaboon Ebony, unfortunately the husks broke off. The clients wanted to inquire if by chance could I take a bone bracelet cut it down, shape it to fit, and glue the pieces in as husks.  As I was always told early on in my career, you never say no to a paying job.  

Well I did it...  I cut the bracelet and made two husk out of them and glued them in place. Below is a series of photos of the effort and an over view of a beautiful cane. 


Thursday, December 10, 2015

Lee Valley Carbide Sharpener


 Lee Valley is selling an amazing tool for all round blade sharpening. The Universal Sharpener, is nothing more than a solid piece of carbide attached to a foldable knife like holder.  I can't take the credit for finding such an item, my mentor Mike Mascelli is the one who discovered it.  Mike was looking for a quicker way to sharpen scissors, which we usually filed by hand. Sadly these days files are not made as good as they once were, so we have been playing around with other methods.

Well we found it and its a life saver. I don't leave home with out it. But scissors are not the only thing this sharpener excels at, I use it for marking knives, kitchen knives, the knife on the making gauge, axes, spoon carving gouges, and so much more.

I decided to share this since everyone I show this to seems to think its the best thing since Lie-Nielsen starting making the honing guide.  So pick one up before Chris Schwarz blogs about it and than they are back ordered. Here is some more info on Universal Sharpener

Cheers,

FR


Tuesday, December 8, 2015

The honing guide....


Many years ago when I first started in woodworking I would sharpen all my tools with a honing guide. I didn't know how to hollow grind, or even how to lock my wrists to establish a constant angle when honing.  I depended on the honing guide so much that I bought several, with the hopes of owning more than one would speed things along.  What really occurred was every tool was skewed and every water stone got bellied from the honing guide running over it.

Early on I said to myself I must get rid of these honing guides within six months. My reasoning for wanting to get rid of them was simply due to my mentors never used one so why should I. Well today I am happy to say I can hollow grind my tools with out issue, and I can sharpen free hand.  But that all changed once I listened to Deneb Puchalski from Lie-Nielsen tool works.  Deneb broke down sharpening like no other person.  At first I thought to myself wow this is a great selling pitch, but when a fellow craftsman was constantly questioning, Deneb had a response and great reasoning. Everything that Deneb said made sense so I decided to try the honing guide at  the Lie-Nielsen hand tool event.

What I love about the honing guide is the accuracy and ease of use. Its obvious to see quality, but it is a Lie-Nielsen... I am happy to also see that it doesn't take long to get the tools sharp and there is very little concern of dishing of the stones. This is all possible from the Get Sharp Fast system Deneb has developed. Now all my tools won't work with the guide since it is designed for Lie-Nielsen tools, but that said the majority of my tools will work without issue. So there is still a place to master free hand sharpening.  Deneb also shared with me his sharpening process and ruler method, when to use it and why to use it.  I followed his instructions and I must say what a great honing guide and what a awesome sharpening concept he has developed. I ended up buying the honing guide with the basic small jaws and long jaws, I love it. This will also be great to have on hand for students that are just getting into woodworking. This will allow them to achieve success and not be hindered by all they have to learn.

The sharpening set up that Deneb recommends can be seen in the picture below and its exactly what I am going to make to fit my stones.  If you are interested to know more about this process than you can visit Lie-Nielsen Angle Setting Jig PDF and you also visit Fine Woodworking issue #213. The title of the article is Get Sharp Fast. This is a new and welcoming set up that I am happy to own it and so will my future students/apprentices.


Monday, December 7, 2015

Woodworking Publications

Every month or so a new publication seems to be published. Some are better than others, and some are fairly new. The first publication that caught my eye was Fine Woodworking magazine and than I tripped upon Popular Woodworking. Both of these publications are great and opened my eyes to many different aspects of woodworking.

When I attended the Furniture Institute of Mass my hand skills and woodworking knowledge advanced from beginner to intermediate and now to advance.  Do I have still have a lot to learn, why yes I do and forever will.  This is why I love this craft.

Over the years I have fallen out of love for  woodworking magazines. I am not sure why, but for some odd ball reason I thought I didn't gain as much or even nothing at all.  There were even times that I let my publications lapse. But recently this all changed, and I am back in love with everything that is published. Why this change of heart? Well I decided to be open minded. I feel every article has something to offer, either in wording, photos, layout, or just the information itself. There is always something to learn from in every article.  I am also happy to see the newest issues coming in mail because they have been awesome from cover to cover.

Thank you Fine Woodworking and Popular Woodworking for all the hard work.


Monday, November 23, 2015

Shelix Byrd Head-Jointer


Before moving into the new studio I decided to study my work habits and to further evaluate my woodworking knowledge. I also decided to move into a smaller studio. I wanted to limit myself on what I really need versus what I really want. The new space will be 2 rooms that add up to 650 square feet. The floor and wall space is crucial and decisions must be well thought out for the success of the business.  

The first step in the evaluating process is the machinery. Today we will start with the jointer. I once had the hopes and dreams of owning a 16 to 20 inch wide jointer with ship wheel handles. But realistically I don't need that or the hernia. Really all I need is a Powermatic 8 inch jointer with a quick guard removal (Please see photos below).  This particular jointer is 1 of 2 Phil Lowe at The Furniture Institute of Massachusetts  owns. But this particular jointer is also the one he recommends as the jointer to have if I was limited in space & budget.  

What we love about this jointer is the quality and how easy it is to work, adjust, and repair. But really regular maintenance is all that is needed.  One additional feature we have both added to the jointer is the Byrd Shelix head.  Which by far is the best out in the market. Phil and Artie made quick work installing the new head at the school. But when it came to my jointer... well it was a different story.

Removing the old head was easy. Installing the bearing was quick work. Inserting the helix head was a little tricky with all the individual cutters. I also couldn't get the head to spin with out grinding some the overly generous welds left from the manufacturing process 1969-70. Overall the process was easy. I adjusted the tables to the max capacity without hitting the cutter head. This is where patience is need to ensure the proper rotation of the head.   

This is when I quickly noticed that I couldn't raise the out feed table high enough to prevent snipe on the tail end of any board I would run over the jointer. This is where all the frustrations and questioning begins. Did I order the correct head? Did Byrd ship the correct head? Is the head too big? What can I do now?  Darn it!!!!! OMG!!!

I am happy to say I did order the correct head and the head met the tolerances by the engineers at Byrd Tool Co.  With the advisement of Byrd and my friend Artie I simply ground the casting on the out feed table with a dremel tool and a abrasive wheel.  This process took about an hour and I removed more than I needed. For I sure didn't want to install the head and find out I needed to grind more material.      

With all that grinding and swearing behind me, the jointer is ready to go. I can hear Phil saying its Perfect!!! In the end of all this invested time and frustration was all worth it.  For its perfect and purrs like a dream.  Many thanks to Byrd and my buddy Artie. 


Friday, November 20, 2015

Your Brand.....

The Story of Telling

Where Your Brand Story Ends


Like the gym in my city you can invest time, energy and considerable resources into tellingyour story.
But the stories your customers tell are what tomorrow’s customers are paying attention to.
Your brand story ends where their stories begin.
The question might not always be, “how many people can we attract or make aware?“
It might be, “how can we make sure our customers are telling the story we want others to hear?”

This isn't my post or my words above, but they are my guidance in trying to establish my brand. For information please visit; http://thestoryoftelling.com.

Wednesday, November 18, 2015

Clamp storage


As many already know I am addicted to buying quality clamps. Every time I tell myself I am done purchasing clamps I find another one I must have.  For the past two weeks I have been searching and asking my fellow woodworkers for clamp storage ideas. Sadly there really isn't many options than the common few. I can hang the clamps on the wall taking valuable wall space. I can store them in a drum and pinch myself or whack myself wrestling clamps out from the drum.  Or I can make a clamp tree/rack on casters.

One of the issues people have with clamp trees is the difficulty to move the rack once its loaded to the max. Yet this common issue everyone complains about can easily be resolved. Its quite obvious to me  if a is made to hold every clamp you own than of course it will difficult to move. I also didn't want to get a hernia trying to move the rack. So I decided to make a 2 foot wide clamp rack.  I simply used 2x4's, angle iron (bed rails), and 3 inch casters.  I screwed the whole thing together. There wasn't any plans, but I did have one look at for inspiration. I was surprised how much fun it was to make and how easy it moves full of clamps.    

Now the only issue I have is that I need like four more racks. I will also need to find other options for those 6, 7, and 8 foot clamps that are rarely used. 


Saturday, October 24, 2015

The basic tool list


During Woodworking in America this pass September, Dyami Plotke from the Modern Woodworkers Association asked me if I could do one thing differently to the business what would it be? My response was I would buy a lot fewer hand tools and smaller power equipment. Since returning home from my travels I have been on a mission to reduce the load. Over the years I fell into the trap of collecting, all too common in the woodworking community these days.

Which brings me to the commonly asked question, what do I recommend for hand tools? Well before I get into my preferred hand tool list,  I must inform you that I am not a hand tool only woodworker. I enjoy my machines but they are very basic. For power tools I have a 12inch Powermatic planer, 8 inch Powermatic jointer with quick movable guard, Powermatic 66 table saw, 14 inch Delta Milwaukee bandsaw, 20 inch Delta Milwaukee variable speed scroll saw, and 3  Delta Milwaukee drill presses. From the 3 drill presses 2 of them are bench top versions and the other is a 17 1/2 floor model. Between the 2 bench top drill presses the Homecraft model is set as a mortiser.  I do own other equipment but they are rarely used and I will be selling them at some point.

With this basic set of machinery mentioned above my essential hand tool list can be seen below.

Tool list:

12 inch Starrett combination square
Stanley 12 foot tape measure
Chris Vesper bevel square
Surgical handle with blade. I am using this set up as my marking knife.
Awl
Hammer
Dovetail saw
Tenon saw
Coarse rip saw
Crosscut saw
#4 Smoother Lie Nielsen
#5 Fore/jack plane
#7  Edge/jointer plane
#102 Lie-Nielsen block plane.
 #60 1/2 Lie-Nielsen block plane
At one time block planes were for carpenters, but this isn't true anymore since Lie-Nielsen perfected the tool.
Shoulder plane. Either Clifton 3110 or Lie-Nielsen medium size version.
Set of chisels 1/4, 3/8, 1/2, 3/4, 1, 1 1/4.
Mallet
Mortise Chisel 1/4, 5/16, 3/8. Buy these when you need them.
Router plane #71. I own the Stanley version, but boy do I love the Lie-Nielsen version.
Small router plane #271. Purchase all the blades that are available.
Cutting gauge with knife.
Knew Concept fret saw.  Hands down the best around. All others can't compare.
Bit brace.
Drill bits 1/16-1/2 by 1/32nds or 1/64ths.
Card scraper.
Bastard file
Phil Lowe burnisher
Stanley #80 cabinet scraper
Sharpening stones. These days Shapton ceramic stones are the best and very reasonable.  The grits I recommend is 1000, 5000, and 8000.

Optionals:

Nicholson #49 and #50 rasps. I recommend the ones made in USA.
Half round Grobet #0000 file
Lie-Nielson #62 low angle jack.

Now I am not saying to go out and buy all these tools, but the selection will allow you to make just about anything. I hope this helps.

Cheers,

FR


Saturday, October 10, 2015

Question #2 of 20. Why am I the right person.


Here are the questions;     

1. Why am I doing this?
2. Why am I the person to do it?
3. Why is now the time to start?
4. What problem am I solving?
5. Who is it for?
6. Why will they care?
7. What do the people I hope to serve want?
8. What do they believe?
9. What do they do — where, when, why and with whom?
10. What will customers say to their friends to recommend this product or service?
11. What am I really selling, beyond the utility of the product or service?
12. How can I add more value?
13. What happens because my business or project exists?
14. How will people find me?
15. What’s my greatest strength?
16. What weakness might get in the way if I don’t address it?
17. What does success look like, today, this year, next and five years from now?
18. What do I value?
19. What promises do I want to make and keep?
20. What’s my difference?

Question #2. Why am I the right person?

When answering the list of questions I quickly realized that my business is 3 actually different businesses. Actually maybe its 4 businesses.   I got to into woodworking first as a maker of furniture.  Secondly I  am a restorer/preserver of furniture.  The third part of the business upholstery of furniture using period methods. Lastly I am an educator of information gained from period craftsmen.  

With all the aspects of my business I can only reflect back to my apprenticeship at the Furniture Institute of Massachusetts (FIM). This is where it all really started for me. After graduating from FIM I became a journeyman and worked for furniture studios, cabinet shops, and conservation studios. I applied myself to many aspects of the field to further my knowledge, understanding, and skill in making furniture and the art of restoration/conservation.

There is huge void and misunderstanding of quality in the world today and I feel I help can fill that void.  To be a restorer you first need to understand how to furniture is made before you can restore. There is a delicate approach that a restorer must follow and education is the only way to learn the process. I have studied and continue to study the art of restoration and conservation to further assist my clients.  From my studies customers benefit from all the possible options available in restoring their artifacts. Education is by far the most important aspect in this field. 

The art and craft of upholstery is dyeing and sadly many upholsters are not educated or skilled as they once were.  I decided to get into upholstery because I was already repairing hundreds of chairs every year and than subbing out the upholstery. Every time I subbed out the upholstery I was disappointed in the final product. So I went out and studied under Master Upholster Michael Mascelli.  I never thought I would be an upholster of furniture, but the huge void in this area has forced my hand.  Today I love upholstering furniture and using period methods that was passed down to me. The methods used in period upholstery by far is the highest quality and the items use in making an upholstered seat for example will out live us all. But this isn’t true when modern upholstery materials are used.

Teaching was never something I thought I would be doing. I have taken many classes and wished I could get my money back.  I like to tell students because an individual is a great craftsperson doesn’t mean they are great teachers. I for one stay humble and feel I have a long way to be a great teacher.  That said, many students have told me that I am meant to be a teacher.  I love to share and to educate. What makes me different as a teacher is I understand exactly struggles the students are having.  I have been in their shoes, so I am happy to help bring them to a new level of skill and understanding. Phil Lowe director of FIM is the one who told me that I am meant to teach and because of all he has taught a great foundation has been established.


 I guess this is why I am the right person. I love what I do. I am skilled, talented, and capable of tackling just about anything that comes my way.

Sunday, October 4, 2015

The 20 questions

As many of you may already know, I love what I do for a living. I love making and repairing furniture. But what I love most is learning and sharing the craft to whomever is interested.  Deep down I am one of those people who likes to talk to anyone about my ambitions and goals in the world of woodworking. I enjoy seeking out any craftsperson and picking their brain about business and what it takes to make a living owning a business.  They are the ones that truly understands.  If you look around there isn't many who make a living at this full-time. 

When I was first getting in the field I would ask every professional woodworker for advise about getting into the craft and running a successful business. Sadly each and every one of them told me do not to go into the woodworking world full time. Just keep it as hobby! Than one day I tripped over an article/interview in Woodwork Magazine with Christian Becksvoort.  In this article Mr. Becksvoort said don't go to furniture making school but rather go to business school. This article has a ton interesting material, but this statement has stuck with me since the day I read it.  

So here I am 13 years later as full time furniture maker, restorer, and educator.  I've ignored all the conversations and advice about keeping this as hobby. Now the question is what is next? The next goal in the long list is to band my business and becoming more recognize publicly. Essentially it is time to be on the other side counter versus being the consumer.

This is where the 20 questions come in. I was recommend recently to visit Bernadette Jiwa a specialist in her field in helping business become meaningful brands. Up to this point I never thought of asking myself the 20 questions she recommends a business to ask themselves. To receive these 20 questions all you need to do is sign up for Bernadette e-newsletter which is free. The E-newsletters are inspiring and very informative. I like them especially since it is literally what my life is about. Sometimes there is more to the world than just business and I just need to live in the moment and enjoy what life has given me. 

Anyways back to the 20/20 as I like to call it. My goal for the next several days or maybe the next 20 days is to answer these questions and get a better understanding of my brand and prepare myself for the next step in my business.    

Here are the questions;     

1. Why am I doing this?
2. Why am I the person to do it?
3. Why is now the time to start?
4. What problem am I solving?
5. Who is it for?
6. Why will they care?
7. What do the people I hope to serve want?
8. What do they believe?
9. What do they do — where, when, why and with whom?
10. What will customers say to their friends to recommend this product or service?
11. What am I really selling, beyond the utility of the product or service?
12. How can I add more value?
13. What happens because my business or project exists?
14. How will people find me?
15. What’s my greatest strength?
16. What weakness might get in the way if I don’t address it?
17. What does success look like, today, this year, next and five years from now?
18. What do I value?
19. What promises do I want to make and keep?
20. What’s my difference?

Lets start with question #1 

Why am I doing this?

Working with my hands is an expression of who I am. I love making things and I love to preserve them. Something made by hand is such an enjoyable experience. I love to share with the world items that was once a living tree. There is just an amazing feeling when you see items of quality handed down generation to generation. Everyday information is lost and I believe that everything I have learned is a blessing and it should shared to all who are interested. There is nothing worst than lost information. Its about the craft not the person.