Showing posts with label For Hire. Show all posts

Sunday, August 27, 2017

Turned beaded moulding.


 I needed to make a beaded moulding for a clock I am restoring.  But before I spend the 10 mins of joy making the beaded moulding there is a list of things that must get done first.

The beaded moulding that is attached to the back of the clock door needs to match this exactly. I was able to trace the profile and match the diameter with one of my chainsaw files.

But before I can turn the bead I need to create a mounting plate and two wooden rings that are oversized in diameter.

The first step is to layout center and scribe the desired circle on a piece of plywood and mahogany. Pay attention to the grain direction in the mahogany to ensure it matches.  Once the circles are scribed I cut them out on the bandsaw. Again everything is over sized.


 After the plywood and mahogany are cut I than make a paper joint glued with hide glue. The reason for adding American kraft paper is for ease of removing the moulding from the plywood. The glue up sequence went baltic birch plywood, kraft paper, mahogany. I also used Old Brown Hide Glue for its  open time. With the glue spread I clamped everything together and added wax paper just in case any glue squeeze occurs.


Clamping even inch I could to ensure everything is clamped properly. The last thing you need is the wood to fly off. 

Getting ready for gluing. Often I span my glue ups between the jaws of my vise. This allows proper support as I clamp.

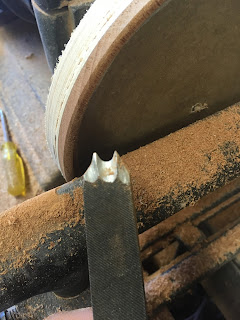
Next came the grinding of the cutter necessary to make the bead. The tool of choice is the tip of an old file. This is a common technique in the restoration world and one that should be remembered. 

Here I am filing the tip of the file to match the moulding. The file I used was a 1/8 diameter chainsaw file. Hand files are made from mild steel so modifying them is quite easy. 

The tip of the file shaped. 

This is the view of the first beveling on he bottom of the cutter. 


After the primary grind has been establish I than use a a chainsaw file, or a small grinding wheel, or dremel to grind as much metal away. I often compare this to a complex moulding plane iron. By removing as much metal as possible I can than hone the cutter with slipstones to ensure a quality cut. 

Once everything has dried and the cutter has been made its time to turn. But first I need to bore a center hole in the plywood so I can screw it to the treaded center of the Carey lathe. Side note: The  W. W. Carey lathe was made in the end of the 19th century in Lowell, MA and an amazing lathe to say the least. 


The screw center. 

Center bored
Before I can start turning the bead I must first remove the necessary material to ensure the lathe and the turning are true and balanced. This is the reasoning for leaving everything over sized. Once everything is close to true, I can than turn the thickness and width down to size. I used a parting tool to do all the lathe work necessary before introducing the customer cutter.

I tested the cutter before reaching final thickness. I wanted to make sure I understood how the tool would cut. 

Where I engaged the the tool to the wood. 

Here you can see I am reaching final width and depth. 

The turning wasn't 100% balanced and true but it was close enough. 

The end result was a success.

There was a lot work involved just to get ready to turn. But boy those 10 mins of turning was fun.


I hope you found this interesting and remember in case you need to make a custom cutter someday.

Wednesday, August 16, 2017

Screws that won't budge. What to do.....


As a restorer  I often am taking something apart and reassembling it. Often the screws that I am removing are slotted. I know, I know. Most of you hate slotted. But I on the other hand love them. So what do you do when a screw doesn't want to budge? Well a long time ago I learned by heating the head of the screw with a soldering iron you can make the wood pull away from the heat. Also if you heat the screw hot enough, once the metal cools it shrinks just enough for the screw to  be loosen. The soldering iron tip I find the most useful is the one that tapers on all four faces and fits into the screw slot.  

Once the screw has been heated a very important too you will need is a proper screw driver that fits properly in the screw slot. Another great tip is to bevel the corners of the screw driver tip so it doesn't ruin the slot.  We restorers like to keep things nice and tidy. Lastly once you've heated the screw and everything is cooled down, make sure to first twist right to break any bond and than rotate left to remove the screw. 

The next blog post will be about keeping track of your hardware. So stay tuned for that. 

Sunday, July 9, 2017

My favorite sideboard

My inspirations for form, style, and proportions come from the pass. I love the sideboard seen below but sadly its in storage and hasn't seen the light in many years, which I find ridiculous. I'm pretty familiar with the form and construction of this piece but can't get into the details of it due to a contract I signed. Which is another ridiculous story.  But I am hoping to get access to this piece in the near future and bring it to life by making a reproduction of all the awesome details.

Sideboard

1790–1805

Object Place: New York City, New York

DIMENSIONS

Overall: 100 x 205.1 x 78.7 cm (39 3/8 x 80 3/4 x 31 in.)

ACCESSION NUMBER

1978.301

MEDIUM OR TECHNIQUE

Mahogany ,satinwood inlays, pine, poplar (?)

NOT ON VIEW


Provenance
1928, Harry V. Weil, dealer; 1920s, Israel Sack, dealer; sold to Edward R. Fearing (private collector); ca. 1962, reacquired by the Sack firm; later acquired by Lewis Cabot; by descent to the donor, Mrs. Judy Cabot Bullitt, 120 East End Ave., New York (Accession Date September 13, 1978)

Credit Line

Gift of the Lewis P. Cabot Family

Sunday, April 30, 2017

Broken round tenon


I am in the beginning stages of repairing 110 chairs for the MIT chapel in Boston Massachusetts. When I am repairing any piece of furniture new, vintage, or antique I always weigh my options. The question I always ask myself is can I save the damaged area or do I need fabricate a new part. There are many things to consider when making this decision and they should not be taken lightly. In the video above you will see me saving a chair rail from one of the MIT chairs by fabricating a new tenon.

The process... To save the chair rail I vertically bored a 1/2 inch hole about 1 inch deep in the chair rail. The rail was 5/8 thick overall. By boring a hole perfectly centered I knew I had 3/32 -1/8 inch of wood all around to help hold the new tenon in place.  Why bore 1 inch in the rail? Over the years I have tested different length and width tenons in holes and have determine that 1 inch is ideal. Anything less can break and anything more doesn't drastically improve the strength.

Once the hole is bored I take a dowel and size it to fit in the 1/2 inch hole. I make the tenon by rotating over a saw blade while using a miter gauge.  This is really quick work and really easy.


The adhesive I love using for such repairs is West System G/Flex epoxy. This epoxy is thick, slow setting, and wicked strong.  I have tested this epoxy by gluing two pieces MDF for 24 hours and than trying to break the joint. What resulted from the bashing of the hammer was everything else broke but not the joint.  

After the epoxy is dry I am ready to glue the chair. The new joint/tenon is stronger than ever. Please note epoxy is only used when all other options will possibly fail. There is no need to use epoxy to glue up the chair. Always think about the next person who will need to fix the chair in the future. 

Thank you for reading and watching the short video. 

Cheers!


Saturday, April 22, 2017

Labeling parts

 I'm in the middle of restoring 110 chairs for a chapel in Boston.  I need to disassemble each of the chairs while keeping track of all the parts.  So what is my method to the madness of parts laying around the shoppe?  Well its pretty simple actually, I use blue tape and a sharpie and label every part. It is very important that each of the markings can easily be seen and each chair has its unique labeling system. By unique labeling system I mean not every chair will start with the letter A or number 1. Some chairs depending on quantity of parts may start with the letter Z and work back to the letter A or start at number 99 and work back to number 1. Some chairs may even have a combination of numbers and letters. When things start to get crazy than I switch color tape from blue to green to purple.  

 In the end it doesn't matter what you label the parts just as long as they go back exactly where they came from.  One important thing to remember is don't use masking tape or duct tape. The adhesives on these two tapes are often to strong and will remove the finish or just leave terrible tape residue which now needs to be removed.

As you can see there is no way I can screw this up and that is the point of labeling.  I hope this helps.